Relocate Neos Folders
Neos has two locations, outside of the main installation directory which store files that help Neos run:
- Cache - Store's temporary copies of assets downloaded while you are using Neos.
- Database/Data - Stores a local copy of your items and things that you are working on, your login status and settings.
If you have a unique drive setup, or want more control about where these files are stored, then this guide is for you.
Folder Default Locations
Cache
By default the cache can be found in: %USERPROFILE%\AppData\Local\Temp\Solirax\NeosVR
To get there easily:
- Push Windows Key + R
- Type/Copy this
%USERPROFILE%\AppData\Local\Temp\Solirax\NeosVRinto the Run box that appears - Press Enter or the Ok button
Database/Data
By default the data folder can be found in: %USERPROFILE%\AppData\LocalLow\Solirax\
To get there easily:
- Push Windows Key + R
- Type/Copy this
%USERPROFILE%\AppData\LocalLow\Solirax\into the Run box that appears - Press Enter or the Ok button
Moving these folders
To move these folders to another location:
- Ensure that your Neos reports "All Synced" at the top centre of your dash. The following steps have the potential for data loss, so please be careful
- Add either of the following command line flags to Neos to move the folders:
-DataPath path_here- Moves the Data folder to the location you specify. Any absolute path syntax supported by the underlying platform's file system libraries can be used here, such as DOS-style or UNC paths.-CachePath Insert_filepath_here- Moves the 'Cache folder to the location you specify. Any absolute path syntax supported by the underlying platform's file system libraries can be used here, such as DOS-style or UNC paths.
- Leaves these in the command line arguments, permanantly
- Once done you may delete their old/original locations
Entering these command line arguments, differs depending on your platform.
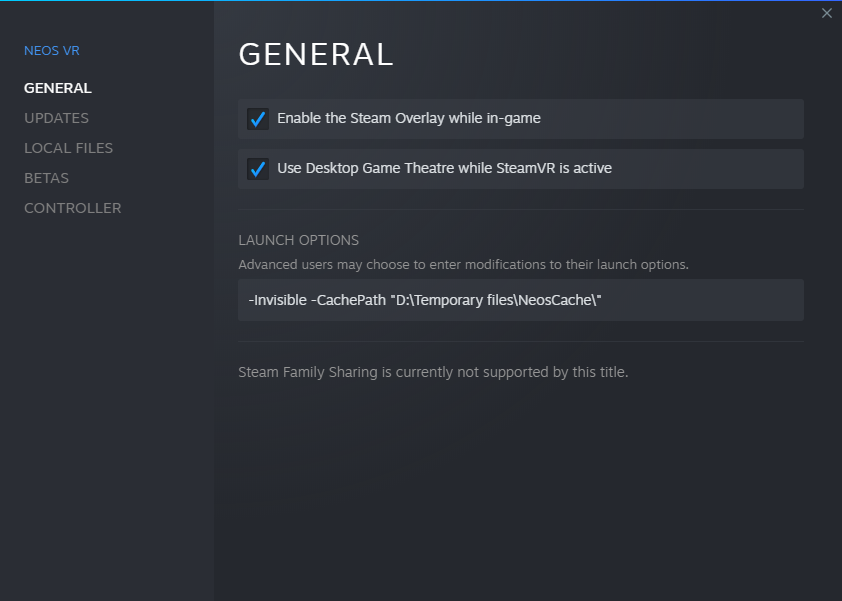
For the Steam build
- Open Steam
- Right click on Neos VR in your library
- Select "Properties" and then "Set Launch Options".
- Enter the command you need to use, exactly as it appears above and Run Neos.
Now, if Neos is launched via Steam, the custom command line arguments will take effect.
Commands entered via this method will not take effect if Neos is launched any other way, such as via the Neos Launcher or by directly launching the Neos.exe.
For the Standalone build
You have two options:
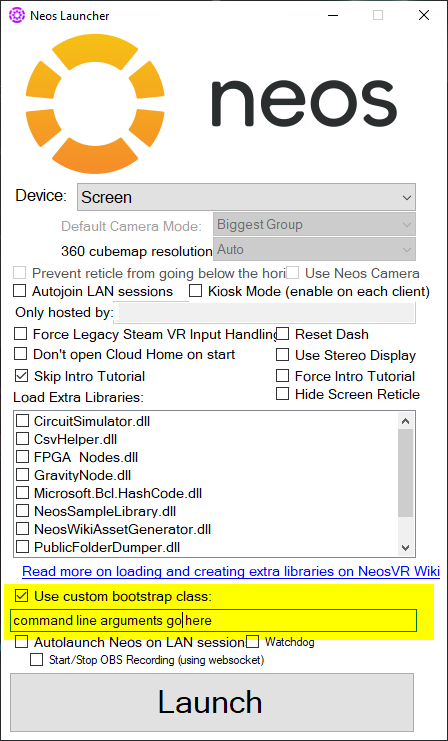
Using the Neos Launcher
- Find the Neos Launcher for the standalone. You can do this by double clicking on the NeosLauncher.exe in the NeosVR install folder
- Check the "Use custom bootstrap class" option
- Enter your command line arguments in the box below this checkbox.
Launch arguments entered this way will only take effect if the Neos Launcher is used to start Neos.
Use a shortcut
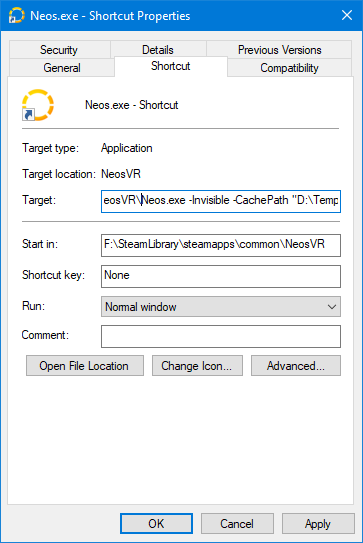
It is possible to use launch commands via a custom shortcut targeting the Neos.exe file.
To create a shortcut:
- Find the Neos install folder and right-click on the Neos.exe.
- In the context menu click 'Create Shortcut'
- Move the 'Neos.exe - Shortcut' file to somewhere more convenient (such as the Desktop).
- Right-click on the shortcut file and click 'Properties' in the context menu.
- This opens a dialog window. Select the 'Shortcut' tab.
- In the 'Target' text box add a space after the Neos.exe filepath and then add your command line arguments.
- Click 'Apply' and 'OK'.
Now, if Neos is launched by double clicking on the shortcut it will launch using the custom options. These will not be applied if a different method is used to start Neos.
There is also a tutorial by ProbablePrime.


