同步冲突
当本地资源与存储在云上的数据不同步时,就可能会发生同步冲突。这可能由多种原因造成。您可以检查 日志文件 以了解哪些文件存在冲突,以及是本地还是云存储的内容较新。在文本编辑器中打开日志文件即可查看它们的内容。
Ensure you're reading the right guide
We have multiple guides for Sync related matters, please ensure you are reading the correct one for your problem, for the "Hub" of these see Sync Errors BEFORE you start.
These problems are slightly different and may require differing steps, so we've split them into separate guides.
DO NOT
- Delete your Neos data/database or cache files. Doing this will likely make you lose your unsynced items, and can cause other side effects
- Try to save and sync any more items/worlds. Doing this will add to your sync queue and if your items/worlds are not syncing properly.
- Click "Exit & Save Homes". Doing this will also add to your sync queue.
- Send any objects or voice messages through the Contacts tab. Doing this will also add to your sync queue and will not send until any syncing issues are fixed.
- Change any settings. Doing this will also add to your sync queue and will not save properly until any syncing issues are fixed.
- Reinstall Neos. Doing this does not help syncing issues, as these are stored in a separate location.
What to do
Figuring out what isn't syncing
This step is optional, but think about what you were doing just before the sync conflict occurred. Were you working on something important? How you follow these next steps may determine if this work is recoverable or not. So it is a good idea to think about what you were doing and how important it was. The following steps can help you.
- Find your log files and open the LATEST one.
- Once the log file is open, look for the phrases "unsynced record", "failed sync", "Record preprocessing failed" or similar, using the "Find" feature(usually CTRL + F)
- If you find instances of this text then you can read them to figure out what is not syncing. For example it might say near this text something like "Home" or "Avatar". This will tell you what's failing to sync.
- Based on what is failing to sync, think about how important that work was.
If you're not sure, ask in our discord, make sure to provide the log file and someone will be able to help you.
Adding a command line argument
Now you've had a chance to think about/look at what is not syncing, you will need to make a choice between two options:
- Deleting the un-synced content this will lose any work that did not successfully make it to the cloud.
- Forcing an overwrite from your local content to the cloud. This is good if you know the copy of your content on your computer is newer.
Based on your decision, you will then need to add ONE of the following command line arguments to your copy of Neos:
-DeleteUnsyncedCloudRecordswill delete any local(to your computer) un-synced files/items from your computer and re-download the cloud copies. Only use this command if you are certain you will not lose important files/items when they are deleted from your computer.-ForceSyncConflictingCloudRecordswill force the conflicting local files/items to be uploaded to the cloud. This will overwrite the existing cloud files/items with your local copies. This can overwrite your cloud data with an earlier/incorrect version, so use it carefully.
To add these to Neos follow the following steps, for either the Steam or Standalone build:
For the Steam build
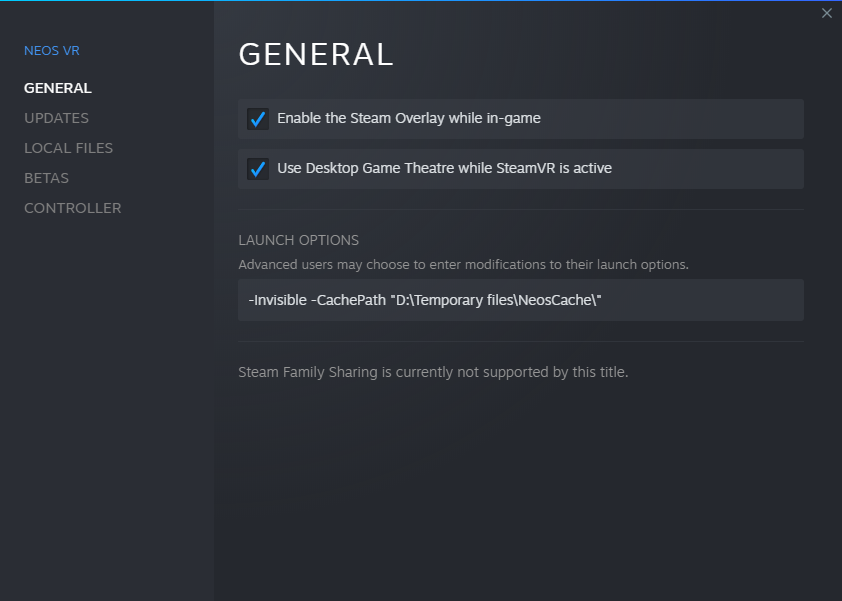
- Open Steam
- Right click on Neos VR in your library
- Select "Properties" and then "Set Launch Options".
- Enter the command you need to use, exactly as it appears above and Run Neos.
Now, if Neos is launched via Steam, the custom command line arguments will take effect.
Commands entered via this method will not take effect if Neos is launched any other way, such as via the Neos Launcher or by directly launching the Neos.exe.
For the Standalone build
You have two options:
Using the Neos Launcher
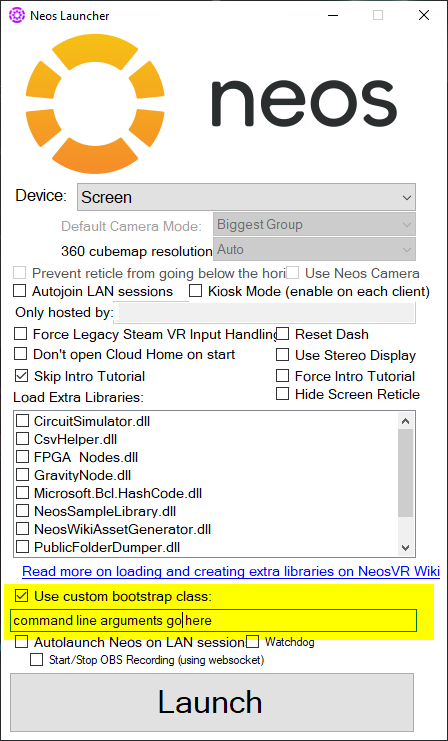
- Find the Neos Launcher for the standalone. You can do this by double clicking on the NeosLauncher.exe in the NeosVR install folder
- Check the "Use custom bootstrap class" option
- Enter your command line arguments in the box below this checkbox.
Launch arguments entered this way will only take effect if the Neos Launcher is used to start Neos.
Use a shortcut
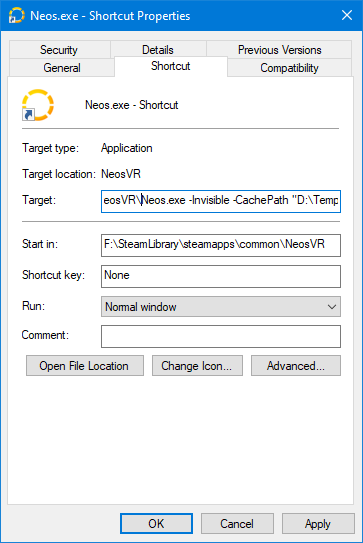
It is possible to use launch commands via a custom shortcut targeting the Neos.exe file.
To create a shortcut:
- Find the Neos install folder and right-click on the Neos.exe.
- In the context menu click 'Create Shortcut'
- Move the 'Neos.exe - Shortcut' file to somewhere more convenient (such as the Desktop).
- Right-click on the shortcut file and click 'Properties' in the context menu.
- This opens a dialog window. Select the 'Shortcut' tab.
- In the 'Target' text box add a space after the Neos.exe filepath and then add your command line arguments.
- Click 'Apply' and 'OK'.
Now, if Neos is launched by double clicking on the shortcut it will launch using the custom options. These will not be applied if a different method is used to start Neos.
There is also a tutorial by ProbablePrime.
Running Neos
Once you've added one of the above commands following the above instructions. Run Neos once, when it is running look for All Synced at the top center of your Neos Dash. This will indicate that the sync issue has been resolved.
Cleaning Up
Once the issue is resolved, remove the command line argument that you added. It is only needed while you are actually fixing the conflict. Leaving these command line arguments in place permanently may result in data loss.
Other Issues
If you believe that the syncing issue is caused by something else please double check our other Sync Errors guides.


