Scene Inspector Dialog
Jump to navigation
Jump to search
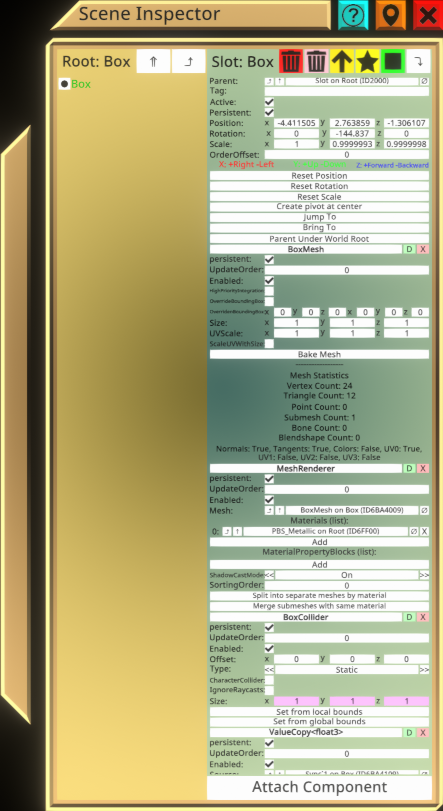
The Scene Inspector as seen in Neos, with a slot containing a Box Mesh selected

Scene Inspector
The scene inspector is used to navigate all objects in a world and view and edit the properties of any object. The scene inspector will let you modify absolutely anything in your current world. This includes things that could break how you interact with the world, so use caution when changing things off the root node that you are not familiar with. You can always quit and come back to reset everything though; you won't break anything permanently unless you save changes to the world, so feel free to experiment.
Basic Layout of Scene Inspector:
The left pane contains the scene hierarchy:
- Double-trigger-click an item to select it. The currently selected item's name will be colored green. The item will be selected in the world also.
- Drag an item using the grip button and release it on top of a different item to move it. This re-parents the dragged item.
- Dragging with grip is also used with the Developer tool tip to open a new scene inspector, and with the LogiX tool tip to create a LogiX node (press the secondary action button while holding the item outside the scene inspector window).
- Slots with a filled circle in front of them have no children.
- Slots with an empty box in front of them have children; click the box to expand the hierarchy at that point.
- Slots with a downward pointing arrow are expanded; click the arrow to collapse.
- To go up one level in the hierarchy, click the upward pointing arrow at the top left. Note that this does not change the selected slot, you will have to double-trigger-click to change the selection.
- To navigate to the root of the current object, click the up arrow with the double tail. The root of an object is defined using components.
- To set the current slot as the base of the visible hierarchy in the inspector, click the downward pointing arrow at the top right. Viewing the hierarchy from the root can cause lag, so this can help with performance. Also, in deep hierarchies the item names can get small and hard to read, and resetting the visible hierarchy will help with that.
- Orange colored items are not persistent and won't be saved when the world is saved.
The right pane contains the object properties and components:
- The basic slot properties like name, position, and rotation are at the top. All attached components will be below this. Trigger-drag to scroll the list.
- The red trash can button at the top right will delete the selected slot. This will also destroy associated assets outside of the hierarchy.
- The pink trash can button at the top right will delete the selected slot, while preserving associated assets outside of the hierarchy.
- The yellow up arrow will create a new parent for the selected slot. The selected slot is moved to be a child of this new slot.
- The yellow star button makes a new empty child for the currently selected slot.
- The green square button at the top right will create a copy of the selected slot.
- Trigger-click on any property to edit it.
- Grip-drag on any property to copy the value, and drop it on any other value to paste. This works between separate scene inspector dialogs and also works on LogiX nodes.
- Grip-drag on a property name to get a reference to that property. This is used for certain components.
- Grip-drag on a component name with the LogiX tool tip and click the secondary action button in the world to create a LogiX node for that component.
- The red X next to a component name will delete that component.
- The green D next to a component name will duplicate the component.
- The circle with a slash through it to the right of a reference field will clear that field (change from a reference to null).
- The upward pointing arrow to the left of a reference field will open a new scene inspector dialog for the referenced object.
Buttons
| Icon | Name | Use |

|
Destroy | Destroys the slot and its children |

|
Destroy Preserving Assets | Destroys the slot and its children, but moves things like materials and meshes out first so that they aren't lost |

|
Insert Parent | Inserts an empty slot as a parent of the currently selected slot. The parent gets the position, rotation, and scale of the slot, and the slot's position, rotation and scale are reset. |

|
Add Child | Adds an empty slot as a child of the currently selected slot |

|
Duplicate | Creates a copy of the currently selected slot |

|
Set Root | Sets the currently selected slot as the root of the hierarchy view. Useful for drilling down into deeply nested hierarchies. |

|
Help | Shows help |

|
Pin | Pins the inspector to you, making it move when you move around (excluding movement around your playspace) |

|
Close | Closes the inspector |
| Object Root | Focuses the hierarchy on the object root for the current selected slot (e.g. a User slot, an avatar root slot, etc.) | |
| Root Up | Focuses the hierarchy on the parent of the current root, thus moving up one level |