Požadavky na humanoidní kostry pro IK
Když importujete rigged humanoidní 3D model do Neosu, může být automaticky nastaven s inverzní kinematikou, což zároveň umožňuje využití jako full body avatar. Jsou zde určité požadavky pro rig, aby byl rozpoznán jako humanoid/biped a byl nastaven tímto způsobem:
Support Formats
If you have a rigged model, that's compatible with other VR Platforms such as VRChat etc, then it should work out of the box. Just try importing the avatar.
As a reminder, we don't currently support the importing of .unitypackage / .vrm / .asset / .mesh / .prefab files.
Supported Humanoid Avatar formats:
- FBX
- GLTF
Overall Rig/Model Requirements
General Guidance
- Your model should be in an A-pose or T-Pose.
- The Orientation (forward facing direction) of your model should be along the positive Z axis.
- A flipped Z axis can be detected but might contain bugs.
- As a quick validation for this:
- Check the "Force T-pose" option in the advanced import settings. If hands are crossed, rotate 180 degrees along the Z (up-down) axis. If one hand is in front and the other hand is in back, rotate 90 degrees along the Z (up-down) axis.
Ignoring Bones
Sometimes, you might want to ignore a bone in the IK process within Neos. Luckily you can do this. Simple add <NoIK>(case insensitive) to the Bone's name anywhere within the bone's name. This bone will then not be considered for IK purposes. It's children will though. This is often useful for twist bones or clothing/hair bones that are being detected as skeletal/IK bones.
| Bone Name | Used in IK? | Notes |
|---|---|---|
| Right Hand | ✅ | Flagged as a Right Hand |
| <No_IK> Right Hand | ✅ | Flagged as a Right Hand |
| <NoIK> Right Hand | ❌ | Ignored by IK |
| Right Hand <NoIK> | ❌ | Ignored by IK |
| Right Hand <noik> | ❌ | Ignored by IK |
| Right Hand <NOIK> | ❌ | Ignored by IK |
| bo<nOiK>ne | ❌ | Ignored by IK |
| One day I went to the park, the park had <noik> | ❌ | Ignored by IK |
Bone Requirements
When you import a model, Neos uses pattern matching and heuristics to figure out the layout of your Model's Bones. This means that bone names are largely case insensitive and can have additional data around the name. As an example "hips", "Hips", "HIPS" and "cheese_hips" should all be detected as the model's hip bone. The heuristics are also forgiving of spaces so "upper arm" and "upperarm" should also be flagged correctly as an "Upper Arm" bone.
This is quite good at picking up a variety of rigs but to help you can follow this format.
An extensive guide is presented below, with a key information for each segment of the body.
If this is too much detail you can also skip to a summary or download a sample rig
Central Spine/Hips
The root of the model's armature should be a single hips bone, that faces upwards, see the table below for valid names for it.
Following the hips should be a chain that leads from the hips upwards: Hips -> Spine -> Chest -> Neck -> Head.
So in summary:
| Order | Part | Alternative Names | Invalid Names (Do Not Use)❌ |
|---|---|---|---|
| 1st | Hips | hips, pelvis, root | hip |
| 2nd | Spine | spine, chest | |
| 3rd | Chest | chest, upper chest, ribcage, spine1, spine2 | |
| 4th | Neck | neck | |
| 5th | Head | head |
Upper Chests
Many Avatars have an extra bone segments in the central spine, that's usually called "Upper Chest" or "Spine2".
- Hips
- Spine
- Chest (Sometimes called Spine1)
- Upper Chest (Sometimes called Spine2)
- Neck
- Head
These are NOT required, but we still support these. In these cases the "middle" "Spine" bone will be ignored for the purposes of IK.
Shoulders and Arms
Two arms should be attached to the "Chest" bone from above, one for each side of the model. Use the letters "L" and "R" to indicate which side of the model the arm is on. These are also case insentive so "l" and "r" are ok.
The order should follow: Shoulder -> Upper Arm -> Lower Arm -> Hand. We'll cover fingers in another segment.
| Order | Part | Alternative Names |
|---|---|---|
| 1st | Shoulder | shoulder, clavicle, collar, collarbone |
| 2nd | Upper Arm | upperarm, upper arm, arm, bicep |
| 3rd | Lower Arm | fore arm, forearm, lower arm, lowerarm, elbow |
| 4th | Hand | hand, wrist, palm |
Hands
Hands can appear quite complex but they don't need to be. Before we move onto bone names keep in mind the following:
- Fingers
- Each finger must have at least two segments.
- But we support up to 4 segments per finger:
- Metacarpal
- Proximal
- Intermediate
- Distal
- We need at least 3 Fingers to identify a hand
- Thumbs
- We need an identifiable thumb.
Additionally, if your model has 5 fingers, we'll use geometric detection to figure out what your bones are called. This process looks at the rig and can figure out which finger is which.
Even with these things in mind, you may want to setup the fingers manually. So as with other segments here are some comments on the names of the bones.
For each finger: <fingername>1 -> <fingername>2 -> <fingername>3 -> <fingername>4
Where the finger names are:
- Thumb
- Index
- Middle
- Ring
- Pinky
Or explained in a table:
| Finger Number | Finger Name | Alternative Names | Example Structure |
|---|---|---|---|
| 1 | Thumb | thumb1.L -> thumb2.L -> thumb3.L -> thumb4.L
| |
| 2 | Index | point, pointer | index1.L -> index2.L -> index3.L -> index4.L
|
| 3 | Middle | middle1.L -> middle2.L -> middle3.L -> middle4.L
| |
| 4 | Ring | ring1.L -> ring2.L -> ring3.L -> ring4.L
| |
| 5 | Pinky | little | pinky1.L -> pinky2.L -> pinky3.L -> pinky4.L
|
Finger Identification
Neos uses the following code to try and find what your fingers are:
public static FingerType? NameToFingerType(List<string> names)
{
    if (names.Contains("thumb") || names.Contains("th") || names.Contains("thm") || names.Contains("thmb"))
        return FingerType.Thumb;
    else if (names.Contains("index") || names.Contains("point") || names.Contains("in") || names.Contains("ind"))
        return FingerType.Index;
    else if (names.Contains("middle") || names.Contains("mid") || names.Contains("mi"))
        return FingerType.Middle;
    else if (names.Contains("ring") || names.Contains("ri") || names.Contains("rin"))
        return FingerType.Ring;
    else if (names.Contains("pinky") || names.Contains("little") || names.Contains("pi") || names.Contains("pin") || names.Contains("pnk"))
        return FingerType.Pinky;

    return null;
}
As you can see its quite flexible and forgiving.
Legs
Legs are simple compared to everything else. Each leg should be connected to the Hip bone. Use the letters "L" and "R" to indicate which side of the model the arm is on. These are also case insensitive so "l" and "r" are ok.
| Order | Part | Alternative Names |
|---|---|---|
| 1st | Upper Leg | upper leg, upleg, thigh, upperleg, hipL, hipR |
| 2nd | Lower Leg | leg, calf, knee, shin |
| 3rd | Foot | foot, ankle |
| 4th | Toes | toe, toes, ball, toebase, toes |
Digitigrade Legs
Neos does not support Digitigrade legs natively. Many community members have created systems to support them. An example of this can be found in Shrike's Video
Heads
Heads are simple, but some data is available to help you in a few areas.
Eyes
Neos sets up avatars with automatic eye movements and if you have a compatible headset Eye Tracking is supported. For this to work you'll need eye bones named like so:
| Part | Compatible Names(Case Insensitive) |
|---|---|
| Left Eye | LeftEye, Left Eye, Eye.L,Eye_L |
| Right Eye | RightEye, Right Eye, Eye.R,Eye_R |
Jaws
Jaw bone based animations are possible in Neos, but are less common due to Blendshape/Viseme support, If you'd still like to use a Jaw bone name it "Jaw"(Case Insensitive).
Visemes
Visemes are covered elsewhere as they aren't associated with the rig or bones of a model.
Overall Summary
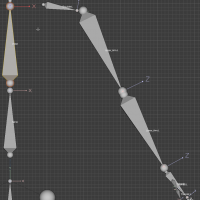
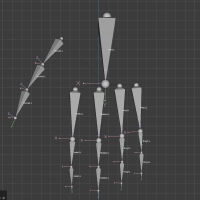
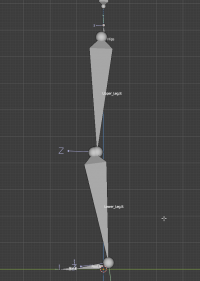
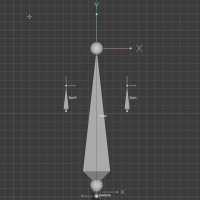
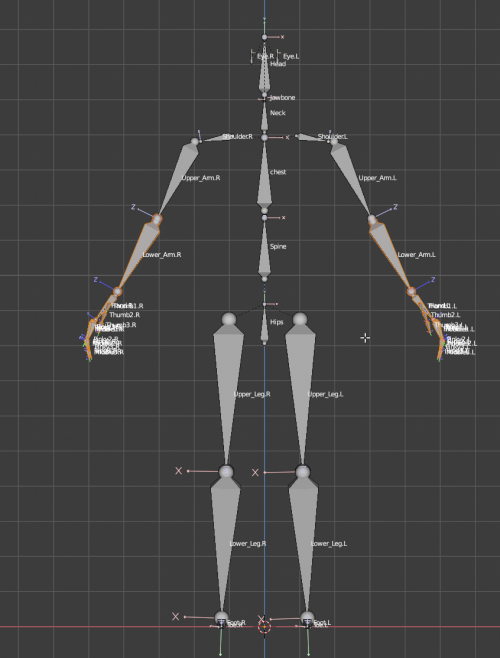
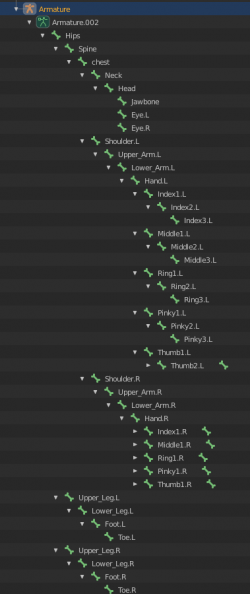
Here are some photos of a summary of the example rig. See above for more detailed notes:
Example Rig
A sample Blender rig can be found here: Download from Dropbox.
Supported Tools
- Mixamo generated rigs work well and without any changes.
- Ready Player Me avatars work well and without any changes.
- There is however, some issues with some | Ready Player Me outfits.

